

Throughout the years I’ve picked up a load of makeup tips and tricks which I often take for granted and it’s only when I have a client or a friend asking me what’s the best way to apply foundation? or do I apply primer before or after my moisturiser?, that I realise that there is a whole world out there that doesn’t really give two hoots about makeup on an everyday basis, but when there comes a time where they want to use it, they want to know how to go about it. For this reason I have put together a list of my Top 10 makeup tips and tricks that may help those who occasionally like to dip their toes in the world of makeup.
1. Perfect Brows
Do you feel a bit helpless when it comes to your brows? Have you plucked them into oblivion or are too scared to go near a pair of tweezers? Not too sure where your brows should start and where they should end? Trust me I’ve been there so I feel your pain.
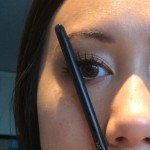
For the perfect brows, it should start inline with the edge of your nose where the nostrols are.
If you imagine a line or take a pen and line the outer edge of your nostril, the line/pen should run up towards the brow making sure it rests just on the outer edge of your iris (the coloured part of your eye). The position of where the pen sits on your brow is the ideal place where your arch should be.
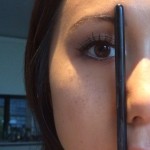
If you imagine the line (or use your pen again) starting in the same place but shifted over so that it is sitting on the outside corner of your eye, the position of where the line falls in the brow area is where your brow should ideally end.
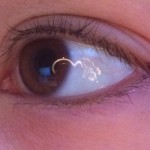
2. Brighter Eyes
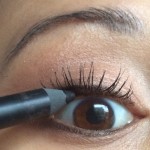
For brighter looking eyes, avoid using white and opt for a nude toned eye pencil and fill in your lower waterline. Nude is less stark and a more natural shade to make your eyes look healthy and wide awake.
3. Feline Flick
I would advise that you draw your flick with your eyes open because depending on your eye shape, you can find that if you do it with your eyes close then go to open it, the line/flick is no longer visible or it ends up wonky or doesn’t line up. I find it helpful to draw the flick on first and then continue it into a line along your lash line.
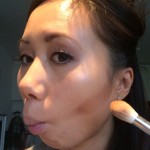
4. Chiselled Cheekbones
For cheekbones you never knew you had, suck in your cheeks and draw a line with your loaded brush from the mid-point of your ear and run it parallel to your jaw line. Then you want to blend it in well in an upward motion to create a lifted look to the face. If you blend downwards, it will make your face look droopy and we don’t want that.
5. Fuller Lashes
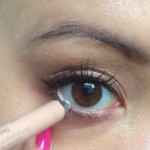
A trick I swear by and don’t ever leave the house without doing is tight lining water line with a black eyeliner. This makes a world of difference and makes your lashes look much fuller than they actually are. If you are confused as to where your water line is, it’s the inner rim of your eye and where the top one is normally less visible than your bottom one. It can take getting used to as running an eye pencil along it is the tickle-lish and weirdest sensation.
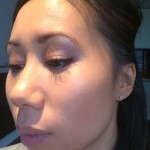
6. Blushing Bride
So ok you don’t need to be a bride to wear blush but do you ever get confused as to where to apply it? What are the “apples of your cheek” exactly? Well I’m glad you asked. The apples of your cheeks are the fullest/fattest part of your cheek and can be found by simply smiling. Yep there they are and that’s exactly where you apply the blush. Try not go too close to your nose though and I’d say only go as far as parallel as outer edge of your iris.
7. Foundation Matching
My only advice here will be to try before you buy. Don’t just opt for the one the sales assistant hands you. Ask for a sample, and if they don’t offer it to you, shop elsewhere. The very least the brands/stores can do is to try the foundation on you but don’t feel obligated to buy it. You need to test the foundation away from the store environment because store lighting can probably pretty much match you up to any shade. You want to look at it in natural daylight. The right colour should also blend in very easily and seamlessly. You would also want to test the foundation first to see how it reacts on your skin, it’s lasting power (you may need it for your wedding day so are likely to want something with long lasting staying power), to see if it oxidises (some foundation will change colour and often get darker once left to set on the skin) etc.
8. Curling Power
If you, like me, have stick straight lashes that need the help of a curler to create the illusion of bigger eye but find that mascaras just make your lashes flop back down, I would recommend you try using a waterproof mascara.
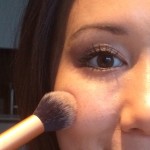
9. Patchy Powders?
Do you ever find that when you apply powder products over your liquid foundation, that it goes on patchy and clings to the skin in a very unflattering way? I have the tip for you. Once you have applied your liquid foundation onto your skin, take a large powder brush and apply a very light dusting over the area where you want to apply the powder product e.g. over the cheek area before you apply a contouring powder. This helps to create a smooth, dry surface for the powder to adhere too and also helps to blend the product much easier.
10. Luscious Lips
For lasting power on your lip, line your lips and fill them in with a lip pencil the same shade (or similar) as your lipstick before going in with the lipstick itself. Working in thin layers will help the product stay on for longer. If you’re going for a matte lip, be sure to prep your lips beforehand as in give your lips a good exfoliating scrub to get rid of any flaky skin. Then moisturise with a lip balm before you start doing any of your makeup so that by the time you get round to doing your lips, they would have had the time to absorb the balm and look plump and nourished.
So that’s my top 10 tips. Hopefully if you have never heard of any of them before that you’ll give them a go. I promise you that it will make a world of difference. Do you have any tips up your sleeve that you care to share?
1 comments