Lorac Pro Palette – Smokey Taupe & Mauve Eyes

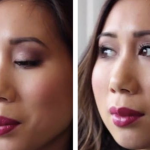
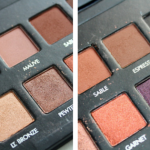
The Lorac Pro Palette is something of a Cult product in the beauty blogging/YouTube world and it still amazes me that this product is still NOT available in the UK. I thought it would be easy to get my hands on it when in New York but nope, I failed miserably to track down an Ulta or even a Nordstrom which is where they are said to reside. Desperate and adamement that my life was incomplete without it, I ended up in the risky world of Ebay, and boy oh boy, is it a place that grabs you by the horns and pulls you in so deep that you would struggle to come out with your credit card intact. After doing a lot of research, which included watching videos of how to spot a ‘fake’ Lorac palette, I was armed and dangerous and ready to take the plunge. The rest they say is history and I am the proud owner of a Lorac Pro Palette. It’s only right that I share my new purchase with you guys and went for a smokey, taupe slash mauve eyes which I made an exception for, moving away from the warm oranges and red based browns of late.

I hope you like this look! Don’t forget, thumbs up and Subscribe!! x

Video Transcript:

I had a little bit of a head start and have already got my foundation on, my brows done and my eyes primed.

For an all over base, I’m am applying the shade Cream all over the eyelid which will also help to set the primer.
Then I’m applying the shade Taupe into this crease and this will act as my transition shade.
Then to add a hint of mauve to the eyes, I am using the shade also called  Mauve and applying it on top of the Taupe shade.
Then to ensure that there are no harsh edges, Im using a fluffy brush to blend the shadows together.
Then I’m going in with a flat shader brush and into the shade Pewter and applying to the outside half of the eyelid.
Then going in with the shade Light Bronze, I’m applying the shade to the inside half of the eyelid.
Then I’m going back in with the shade with Taupe and Mauve and redefining that crease area.
Then back in with the fluffy brush to ensure everything is well blended with no harsh lines.
Then to further intensify the outside corner, I’m going in with the shade Sable and applying it to the outer third of the eye and also the outer crease.
Then back in with the fluffy brush.
Then again same on the other side.
Becuase I wanted an even more smokier look, I’m mixing the two darkest shades Expresso and Black and creating a v shape on the other part of my eye.
Then taking the brush I used for the crease shade with no extra product, I’m just blending the colours together.
Then mixing the shades Expresso and Sable, I’m running that along my bottom lash line.
Then mixing the shades Expresso and Black, I’m running that along the outer third of my bottom lash line.
Then taking the shade Nude, I’m highlighting my brow bone.
I’m also taking that same shade on my tear duct area to really brighten up the eyes.
Then I am lining my top lash line and my bottom outer quarter of the lash line with Charlotte Tilbury’s Rock ‘n’ Kohl Iconic Liquid Eye Pencil  in Barbarella Brown.
Taking a smudger brush, I am smudging out that Kohl liner for a soft and smudgy effect.
Then I’m curing my lashes to really open up the eyes.
For big, fat lashes, I’m using Loreal’s Volume Million Lashes Waterproof Mascara and applying several coats of it on the top lashes and just a single coat for the bottom lashes.
Now, I’m gonna go a little crazy with the concealer now and I’ve only just discovered the Maybelline Eraser Eye Concealer in the shade light. This is just so lightweight and really brightening too. I’m applying it under my eyes in a V shape, the centre of my forehead, along my nose and my chin.
Then taking a damp beauty blender, I’m blending all of the concealer out. The pointy bit of the beauty  blender is really great for getting right in there under the eyes.
Then I’m setting my under eye concealer with the Laura Mercier Secret Brightening Powder which I’ve just dipped my beauty blender in.
Then taking the Nars Radiant Creamy Concealer in the shade Custard I’m applying it to any visible redness which is mainly around my nose but I also have some broken capilaries either side of my mouth which I absolutely hate.
Then with the beauty blender, I’m going to again blend that all out.
Then taking a big fluffy brush, I’m setting all that concealer work to ensure it sets and stays in place all day. I used the Bourjois Healthy Balance Powder in shade 53.
 Then to carve out some much needed cheekbones, I’m applying Benefit’s Hoola into the hollows of my cheeks but also taking it up the temples and around my hairline to add some warmth to my complexion. Excude the duck face, I just find it the easiest way to find where I need to apply the product.
Then to highlight the tops of my cheekbones, I’m using Becca’s Shimmering Skin Perfecter Pressed Powder in the shade Opal.
For blush, I’m using Max Factor’s Creme Puff Blush in the shade Seductive Pink and applying that to the apples of my cheeks.
Then I always like to go back in with the beauty blender and soften out any harsh edges and make the blush look seamless.
For my lips, I’m going to go with a plum toned lipstick to tie in with the eyes and theres only one lipstick for that and it’s Mac Plumful.
Then I finish off by setting my makeup with a pressed powder which I forgot to film.


(Visited 335 times, 1 visits today)

You may also like...

Tagged:

Leave a Reply

Your email address will not be published. Required fields are marked *