
Hi Guys. I thought I would film a look using my Laura Mercier Luxe Colour Wardrobe Dual Decker Colour for Eyes and Cheeks, which I recently picked up in the Space NK sale for less than half of the original retail price. There maybe some left in stock so if you want to snap up this bargain, you’d better be quick. The look I went for is a lilac/ purple eyeshadow look complimented with a rich brown to add to it some warmth and make the eyes more neutral and easy to wear. This look is especially great for those with brown eyes. Enough chat now and onto the video. Happy viewing!
Below is a transcription of the video.
First of all I’m going to be using the YSL Touche Matt Oil Free Primer and I like to apply it down and along my t-zone because I find that it’s the area that gets most shiny during the day and a little goes a long way with this product. It does have that texture where it feels quite silicone-y but I don’t seem to mind that very much, I know some people don’t like it. But this also just provides a nice, even base for your makeup to go on top of.
So I’m going to be using the Makeup Forever HD High Definition Foundation and I’m in the shade 128. I’m just going to take a pump of it on the back of my hand and just take my finger and just dab in it the places where I need it which is pretty much all over but just so it’s kind of fairly distributed Then I’m going to take my damp beauty blender and then just go on and in patting motions just kind of pat the product in. I find with the beauty blender it gives you such a natural, flawless finish compared to a brush. Sometimes when you use a brush, you can get tale-tale streaky signs. Then I use the pointy end and to go around the crooks of the nose. Make sure you’re taking the foundation right up to the hair line.
Then I’m going to go onto my brows and for that I’m going to be using the Hourglass Arch Brow Sculpting Pencil and this is the shade Dark Brunette. I tend to use the spoolie end first just to comb through my brows and I tend to brush them downwards so that you can kind of see the shapes of your brows more clearly and then I go in with the waxy pencil side. I tend to start from the inside brow and just kind of working my way out. When I’ve kind of done with putting the product on I go in with the spoolie to brush it out and it just gives that natural, soft look to it. Just going to go through my other brow. And because the waxy brow pencil is angled, it just makes it that much easier to kind of follow the shape of your brow. Using the spoolie again just to brush through it. Right, and to set my brows I’m going to go in with the Collection Colour Lash Macara in Clear and just brush through my brows to set them in place.
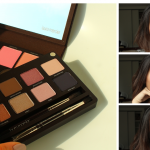
And for today I’m going to be using my new palette that I got from Laura Mercier and it’s the Luxe Colour Wardrobe Dual Decker Colours for Eyes and Cheeks. It’s not actually a new palette, I think it’s a limited edition winter collection palette. It contains eight eye shadows and it’s a mix of matts and shimmers and if you swivel it out like this, it reveals two blush shades and a highlight shade. You also get three eyeliner shades and you get a dark brown kind of kohl eye liner. You also get three brushes with this palette which is excellent because I think in itself is a bargain. First up I’m going to be using the lilac shade which is called Dusk and I’m going to take that on a flat shading brush and this is the Mac 239. I’m going to take it on the inner half of the eyelid. And on the other half of the eyelid I’m going to be using the darker plummy shade and thats called African Violet. To warm it up a little I’m going to go in with a Zoeva 231 Luxe Petite Crease Brush and I’m going to be taking the brown shade called Crystal Beige and I’m going to be putting it on the outside edge of the eyelid and kind of coming up to the crease a little. This kind of adds warmth back to the eyes because I think the plummy lilac-y shades are quite cool. I’m just going to take a blending brush and blend as I go along and that’s just kind of blending out the top edge. Do the other eye. And using my Mac 219 Pencil Brush, I’m going to take the second shade I used which was African Violet and run it from the outside two thirds of the way in. Then I’m going to come in with the lightest shade that I used and go in the tear duct and the remaining third. Then finally I’m going to go into the the dark brown shade that I used and just going to go on the outside corner (of bottom lash line) and kind of bringing it up.
Then I’m going to curl my lashes with my Shu Uemura Eyelash Curlers. I find that curling my lashes makes such a big difference…really opens up my eyes and definitely the best beauty device designed. Then I’m going to line my top lash line with the Charlotte Tilbury Rock’n’Kohl Iconic Liquid Eye Pencil in the shade Verushka Mink which is kind of like a cool toned, slate grey which I think goes with the colours I have on my eyes. I’m going to just pull my eye slightly out but I’m not really going to do a flick or anything. And I’m just going to take it on the outside of my lower lashes. I start from the outer half of the upper lash line because I don’t like to take my eye liner all the way in. Again along the bottom lash line, just the outside third. I’m just going to go back with the Mac 219 Pencil Brush and blend the bottom lash line so it’s not too harsh. It’s just adds a subtle amount of definition.
Time for mascara and I’m going to be using the Loreal False Lash Architect 4 Dimensions Effect Fibres Waterproof Macara (God that’t such a long name). I’m going to be applying a fair few coats of this because I absolutely love mascara. Again, this is another thing that really makes a difference to my eyes. Really makes them look so much bigger and kind of wide awake. I’m also going to take that along my bottom lashes and because this wand is so long and thin I do find that applying to the bottom lashes much easier than if you had a big fat wand.
Note: At this point my camera is flashing profusely.
A recent discovery is the Laura Mercier Secret Camouflage and I’m in the shade SC-4 and I’ve been using this a lot recently, under the eyes and over any kind of redness or blemishes. The brush I’m using is the Zoeva 142 Concealer Buffer Brush and I kind of like to go into a bit of each of the colours and kind of dab it onto the back of my hand, maybe more so of the lighter shade and by kind of dabbing it on the back of the hand with your brush, it kind of warms up the product and that way it’s so much easier to use and itthins the product out I think. I just take it under the eyes just kind of patting it with the brush. Then I like to take my ring finger and just blending the product in and I find that the warmth of my finger really helps to blend out the product really, really well. Then I’m going to use to over any redness and for that I go in more with the darker shade just to match my skin tone a bit better because you can tend to go lighter under the eyes but try and match your skin as close as possible when you’re going over any areas of redness. I tend to get a bit of redness around my nose and got a bit of a spot there. Just kind of dab it in and again I’ll take a clean finger and dab the product into my skin.
Then to set the concealer I’m going to be using the Mac Mineralize Skin Finish in the shade Medium Dark and I’m using the Real Techniques Setting Brush. I find that this is the perfect size brush for going under the eyes and also around the nose as well and I pat the product in rather than dragging it because you don’t really want to disrupt the foundation or the concealer and just down the centre of my face a.k.a my T-zone. This hopefully combined with the YSL mattifying primer should keep me shine free all day. I hope.
To add a bit of warmth and to contour my face I’m going to be using the Sephora Microsmooth Baked Sculpting Trio (in the shade Sweet) with the Zoeva 127 Luxe Sheer Cheek Brush. I’m going to be using the bronzer which is a total dupe for Nars Laguna. *Does the duckface* I put that into the hollows of my cheeks and take it down the jaw line and also up along the temples and accross the hair line. For blush I’m going to be using this shade *points to blush shade in palette* which is a cool toned, medium pink shade and using my Real Techniques Blush Brush I’m going to go into the product and apply to the apples of my cheeks *smiles* and I love this pink colour, really really pretty. Just to add a bit of highlight I’m going to use the Real Techniques Setting Brush and this highlight shade *dabs brush into highlighter in palette and taps off excess* and put it along the tops of my cheek bones but also onto the brow bone in a C-shaped motion. When it catches the light, it looks really beautiful. Finally I’m going to be using Tanya Burr’s lip gloss in the shade Aurora and this is a medium, cool toned pink and it really matches the blush shade I used really well, coincidently. I like her lip glosses because they are so opaque *sniffs product* and it smells so nice aswell.
Before I forget I’m going to be using Barry M’s Bold Black Waterproof Eyeliner just to tight line eyes and I love this trick because it makes you look like you’ve got such full lashes just by colouring in any skin that’s still showing. Then I’m going to be using the tweezerman lash comb and just brush through my lashes, brushing through any clumps that you may have and I think this makes such a big difference. It makes your lashes really soft and fluttery rather than stick like and spider leg like.