

As we transition from the sweet-but-far-too-short-summer period, and into the cooler months of Autumn (or Fall for any US readers out there), I, like many, like to switch up my makeup to reflect the seasonal changes. So away goes the bright pop of pinks and orange-y corals, and a big welcome with open arms to deep, dark reds and vampy plummy hues. As you may have figured, I’m talking about lipsticks as I find it to be the easiest and quickest way of transforming your look from Spring/Summer to Autumn/Winter. As a result I was desperate to do a look with a berry lip shade. Now this look can easily be worn in the Spring/Summer by just switching up the lip colour with possibly more of light sheer pink/peach gloss. I’ll stop rambling now. I hope you enjoy the video. As per usual, there’s a transcript of the video below if you happen to be interested. Ciao for now.
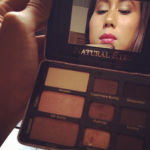
Hi guys, If you want to know how I created this look; a golden smokey eye using the Too Faced Natural Eyes Palette complimented with a berry pink lip, then keep on watching.
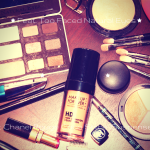
First up I’m going to be using the Makeup Forever HD foundation in the shade 128 (Almond) as my base and to apply it, I’m using my damp Beauty Blender.
As you can see I’m sporting a bit of a tan so this foundation is slightly too light for my forehead so I’m going to blend it in really well to make it work.
Time to get up close and personal.
For my brows I’m using the Hourglass Arch Brow Scultping Pencil in Dark Brunette and to start off , I’m combing through my brows with the spoolie end.
Then I’m using the waxy pencil end to fill in and shape my brows.
To set them in place, I’m using the clear Collection Colour Lash Mascara. This should stop them from flying like the wind.
To prime my eyes, I’m using Mac Paint Pot in Groundwork.
Then I’m going into the crease with a Mac 217 Blending Brush and the shade Nudie from the Too Faced Natural Eyes Palette.
Then with a clean blending brush, I’m blending away to soften the edge off.
Then using a Mac 239 Shading Brush, I’m going into the shade Honey Pot (gold) and applying it to the mobile part of the lid staying under the crease.
Then on the outer third of the eyelid, I’m applying the shade Push-Up (bronze).
Then I’m going back in with the blending brush and again, I’m blending the shadows together whilst getting rid of any harsh edges.
To add more depth and dimension, I’m using the Zoeva 231 Luxe Petite Brush and the shade Sexpresso (dark brown) in the outer V of the eye.
Then taking the blending brush, I’m blending the dark shadow into the crease shade.
To line my lashes I’m using the Maybelline Master Drama Kohl Liner in Dark Brown and running right close to the lash line.
Then taking a Mac 219 Pencil Brush, I’m blending out the liner to achieve a soft but still defined lash line.
Then under the eyes, I’m going to half mimic the top lid by running the gold colour, ‘Honey Pot’ along the inner half of the bottom lash line and then applying the bronze shade along the outer half.
To further define the bottom lash line, I’m using the Maybelline Master Drama Kohl Liner on the outer third of the bottom lashline.
Then again I’m taking a pencil brush and blending the liner out for soft definition.
Then I curl my lashes with my Shu Uemura Eyelash Curlers.
After that, I’ll put a few coats of the Loreal False Lash Architect 4D Waterproof Mascara on both the top and bottm lashes
Then I’m using the Barry M Bold Black Liner to tight-line my upper lashl ine being careful not to poke my eyeball.
Then taking the Tweezerman Folding iLash Comb, I’m brushing through my lashes from the top and bottom to get rid of any clumps for better defined lashes.
Zooming out now work on the rest of the face.
Using the Clinique Airbrush Concealer in the shade 03 Light, I’m going to apply it in a kind of a V shape under the eye area then using the Beauty Blender to blend it out to soften and really brighten up the face.
Then using the Nars Radiant Creamy Concealer, I’m covering up any areas where redness, scars and blemishes are still visible. Again using the Beauty Blender to blend it out for a flawless finish.
Then using the bronzer from Sephora Microsmooth Baked Trio in Sweet, I’m applying it to the hollows of my cheeks and along my jawline with the Zoeva 127 Luxe Cheek Brush.
I use the remaining product on the brush to contour my nose ever so slightly.
Then taking the Nars Mini Blush Brush (came with the cheek kit) , I’m applying the rosey pink blush colour from the Sephora palette to the apples of my fat, chubby cheeks.
For a seamless effect, I go over the edges of the blush with my Beauty Blender just to ensure theres no evidence of where the blush starts and where it ends.
Then to highlight the tops of my cheekbones, the brow bone and along the centre of my nose, I’m applying the highlight shade from again the same Sephora palette with the Zoeva 105 Luxe Highlight Brush.
Using the same brush, I’m appying the Mac Mineralize Skin Finish Natural in Medium Dark down and along my T Zone and under the eyes to set the foundation and concealer and to avoid looking too shiny.
Zooming in once more for a close up.
For my lips, I’m using Chanel’s Rouge Coco Shine in the shade Suspense which is the perfect shade for Autumn (or Fall for any of you from the US). I apply two coats for a more intense pop of colour.
I felt like the eyes needed a bit more oomph so I went over the outer half of the bottom lash line with the Too Faced Natural Eyes Palette in the shade Sexpresso. Using the Mac 219 Pencil Brush, I make sure to blend it in well for a softer look.
And there you have it. A smokey golden eye Look using the Too Faced Natural Eyes palette, teamed with a berry pink lip. This is the perfect makeup for a night out or special occasion and the berry toned lips is perfect for this time of year as we’ve transition out of Summer and slowly move into Autumn.
I hope you’ve enjoyed watching this video as much as I’ve enjoyed making it. Press the thumbs up button to like and subscribe if you want to see more videos like this. See you next time. Bye.