
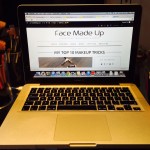
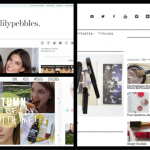
Since starting my blog, I’ve gotten a lot of lovely comments at how professional my blog looks and I’ve even had a couple of friends asking how to get started with a blog for themselves. It was reading the likes of Vivianna Does Makeup and Essie Button and watching their respective channels on You Tube, that inspired me to start my own blog and reignited my school-age passion for writing. So now here I am, a few months down the line, having started facemadeup.com, and doing something that not long ago I didn’t know even existed. Blogging is now my full time hobby. With that in mind, I thought it would be an idea to write up a concise ‘how to’ on creating a beauty blog, or any blog for that matter, on WordPress. I want to include tips and recommendations that has helped me and may well help others who might want to start a blog but feel overwhelmed at the thought of doing so.
I opted for WordPress (and pay for my own webhosting- more about that later) as opposed to likes of Blogger, Tumblr (with free web hosting) etc. Why Wordpress? WordPress is really flexible and allows you to be as creative as you want. If you want to keep it simple, sure you can opt for a basic template, but if you really want to customise it and put your personal stamp on it, then the world is your oyster as they say. It’s built on HTML but if even a nube like me can muddle through it, then so can anyone. The cost will depend on who you choose to host your site and the vast array of plug-ins and themes you might want to choose. All three will be discussed in further detail below.
1. Buying A Domain Name
If you’re thinking about creating a blog then you’ve probably already decided on what your blog will be about. So the first step is to think about is choosing a domain name which is essentially the name of your blog, and part of a network address to identify what domain (the internet address) it belongs to. You can use sites such as Panebee.com to play around with word combinations as more often than not, the names you initially come up with will have already been taken.
Once you think of a name that you like the sound of, check to see if it’s available on a domain registrar such as Domain Monster. At this point you might want to check other social media streams to see whether the same name is available even if you haven’t yet set up those social media accounts. Having the same name (although not essential) across all platforms such as Twitter, Instagram etc will help to reinforce and strengthen your branding. Once you have found the one you want that is also available, you will just need to purchase it (the price will vary from one domain to another) and have it registered.
2. Buying Webhosting
You will then need to find and choose a Web host. A Web what? Yes, I had the same response! A web host is an online service that allows you to store your blog in a small corner of the big, world wide web (otherwise known as a server) and allows you and your visitors to have access it. If you don’t have a host then you don’t have a website to blog on. There are free web hosts out there and if you’re just dipping your toe in the blogging world then you may not want to commit to a fee. I would recommend paying for a reputable one, which are fairly inexpensive, where you know that they will be able to help you out if you get into a bit of a pickle.
You can use the same domain registrar to host your site, which Domain Monster also offers, as this is probably the most easiest and quickest option rather than going to one place for a domain name and another for your web host. It’s entirely up to you.
It’s also worth looking for a web host that offer the 1-click install for WordPress which should make the next step of installing WordPress easy as it will guide you through step by step.
You can use sites like whoishostingthis.com to check out reviews of reputable web hosting companies if you are unsure about handing over your cash but not knowing the quality of service you will get.
Just before we move onto installing WordPress, you will need to point your domain name to your server, only once you have got your domain name and have selected your web host. A reputable web host should be able to help you out with this. This is so when you type in your domain name, it knows where to look to find your server and subsequently connect to it. Only once this has been done that you can move onto installing WordPress. Apparently this process is called updating your name server.
3. WordPress Installation
If you have chosen a web host that offers the 1- click install option, then installing WordPress should be a self-explanatory breeze. It essentially allows you to install WordPress onto your server without the need for any technical knowledge. Even if you haven’t selected this quick route to installation, there are a tonne of guides and tutorials out there that you’ll be able to find via a quick google search such as this one here by Site Ground and this one by WP Beginner.
4. Selecting a WordPress Theme
Once you’ve set up your blog with WordPress and before you start with the blogging, you might want to select a theme for your blog. The theme, which is the graphical interface of your blog, will affect the look and feel of your blog and there are tonnes of different ones to choose from. Upon installation, you will have a default theme already selected and if you’re happy with the way it looks then you can just ignore the rest of this section and move onto Installing Plugins. Some themes are free whilst others require a fee. I would recommend taking a look at Theme Forest (where I got my theme from) or Woo Themes. Although aethestically, each theme will look different from the next, they all have pretty much the same structure behind it e.g. page, posts, categories, plugins etc (which I will go into more detail later on in this post). The theme option is found on your Dashboard along the left hand side under the header ‘Appearance’.
5. Installing Plugins
Right, just before you go swanning off on a blogging quest, you might want to consider installing a few plugins. No, I’m not talking about the same plug that you use when going to blow dry your hair. A plugin in techie, computing terms is bascially a piece of software that acts as an ‘add-on’, allowing your blog some additional functionalities. You might not have even thought that far ahead and just want to get on with writing your first blog post but hear me out. For example, I have installed Askimet which helps to protect your blog from spam. Yes, just like the spam that I’m sure your inbox as well as mine gets inundated with on a daily basis. It will only be a matter of time before you realise that your blog will attract spam in the form of comments. Another plugin you might find useful is Yoast which allows you to do SEO (search engine optimisation) for your blog. Having said that all plugins can be installed as and when you find you need it so if you don’t think you need any just yet, skip straight to the next section, WordPress Navigation.
6. WordPress Navigation
One more thing I promise and then you can start blogging. Just so you don’t get overwhelmed with the unfamiliar territory on your screen. Once you have logged into WordPress, take a look at the left hand side of the screen. There you will see what is known as your ‘Dashboard’ with a number of options, some of which might be self explanatory, others might leave you feeling a little bit baffled. Well worry not as I’ll talk you through the important ones that I mainly use and what I think you’ll need to start off with and their functionality.

Posts
This is where you blog and is displayed in a reverse chronological order starting with the most recent entry. Posts can be categorised and tagged unlike pages. Simply select ‘Add New” to get started with writing your first blog.
Pages
Unlike a post, a page is static and is usually used for timeless information that doesn’t need to be updated regularly like an ‘About Me’ page or your home page. Unlike posts again, pages cannot be categorised or tagged.
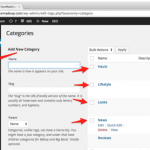
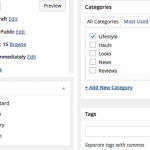
Categories
Categories allow you to group your blog posts together by subject/topic/theme etc so that readers can easily find content that is related to one another. For example, on my blog I have 5 categories; Looks, which are posts on makeup looks and tutorials; Reviews, which covers reviews of product/services; Hauls, which covers shop and tell posts; News, which includes posts such as new product/brand launches and events; and Lifestyle, which covers everything other than beauty, hair and makeup such as food and travel reviews.
Tags
Tags are similar to categories in that they allow you to group posts together that are somehow related. However, tags allow you to be more specific than categories so readers find it even more easier to find content. For example, a reader might be looking for all posts that you’ve written that refers to a particular foundation or a brand of lipstick. By tagging up your posts (with as many tags as you want), it may prove to be a useful tool for readers particularly if you have tonnes of posts but where by filtering using just categories may bring back results that are still to broad.

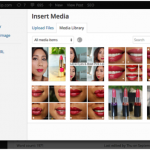
Media
This is where you upload your media files such as photos and videos. Uploaded files get stored in the ‘Library’.
Appearance
Speaks for itself and where you have the ability to change and customise the look and feel of your blog. Aside from Themes as mentioned above, you will also find Widgets.
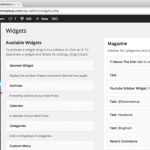
Widgets
Allows you to add/remove specific tools or content to your sidebar, and arrange them how you see fit e.g. On my blog I have added a social media widget and a recent comments widget thus allowing my readers to connect with me through my various social media streams, and to view the latest comments posted in response to my blog by my readers. I’ve also embedded my Twitter feed, YouTube videos and Facebook “likes” box by copying the embed code and pasting it into the ‘Text’ Widget.
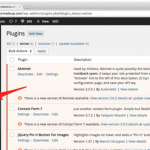
Plugins
Plugins are a software ‘add-on’/component and is a feature specifically designed for a particular function and of which I’ve discussed above. Just like each theme will vary aesthetically, they will too have different features from one another. Some themes come with bundled plugins whilst others do not. If there is a particular feature that you want, that your blog doesn’t have already, there’s likely to be a plugin out there that will give you what you need thus allowing you to customise your blog even further.
7. Start blogging!
Now that’s all out of the way and done with, you are set to start writing up your first blog post. To do that you hover over ‘Posts’ again along the left hand side and select ‘Add New’. A new post template should open up where you can then add in the title of your first blog post and then start blogging in the text box below.
By default, WordPress selects a ‘standard’ format but if you want to include a video, you can select ‘Video’ under ‘Format’ along the right hand side. You can add photos to your blog by selecting ‘Add Media’ and then uploading your chosen image.
Make sure to save your post by hitting the ‘Save Draft’ button on the right hand side in the ‘Publish’ area (although WordPress automatically saves your work every so often but just to be sure, I always click to save as my laptop is prone to crashing).
Whenever you’re ready to publish your blog post for the world to see, simply hit the ‘Publish’ button and ta-dah, you’ve just posted your first blog post.
I hope this has been an easy to understand, straightforward guide to setting up a blog in WordPress. I’ve tried to make it as clear and concise as possible and only mentioning the bits I feel are necessary to know just to get started with your blog. There is certainly a lot more to it and lots that I have yet to learn but I feel I’ve covered the basics in this post and that should be enough to get anyone started.