

When it comes to packing for a holiday, I tend to go into panic mode. Theres only so much you can bring with you when you are being restricted by both space and weight (don’t get me started on short haul, no frills airlines) that has always raised the question, “where does one start?”. Being a natural born geek, a check list is definitely the way to go to ensure that I don’t forget anything or on the flip-side, that I don’t over pack. I like to take a few minutes a week or so before I go away to sit down and think about what I need by category. This highlights anything I need but haven’t got and therefore gives me enough time to do a bit of last minute shopping. It’ll also bring to light products that have multiple uses so rather than bringing three separate products that do three different things, you can bring one palette that covers your contouring, blush and highlight.
So on my recent trip away to Indonesia, this is what I packed in my makeup bag.
Base
I bought some acrylic stacking pots from Muji which comes in handy for decanting liquid/gel/cream products. The particular stack I got contains a set of five pots which I thought was a great way to bring a few different foundation/base options. I wanted to bring a choice of three bases; one with SPF for my non-tanned skin (a mix of Chanel Perfection Lumiere Velvet in B30 and Chanel Vitalumiere Aqua B40), one with SPF for when I’ve got a little more colour to me (Laura Mercier Tinted Moisturiser in Ochre), and one with no SPF for evenings out where the camera might make an appearance (Nars Sheer Glow in Barcelona– no flashback). Unfortunately I didn’t put the acrylic stacking pots in my hand luggage and studpidly left it in my checked-in luggage, and as a result, it took a good beating and smashed all around the lid and rim. Luckily the bases remained untouched and I was still able to use it for the duration of the holiday but the stack was promptly tossed away when packing to come back home. Let’s just say I won’t be making that mistake again.
To conceal bags and blemishes I took with me the Nars Radiant Creamy Concealer in Ginger which is the perfect shade for my tanned skin so works well to cover bags, any redness which I often get around the nose (why is that?) and spots and blemishes should they decide to
pay a visit. I do usually like to use a lighter concealer under the eye for a brightening effect but when you’re working with limited space, one product that does all is fine with me.
To set my base and concealer, I made sure to pack a pressed powder and the one I’ve been using for a while now is the Rimmel Stay Matte in the shade 01 Transparent. I mainly powder just my T-Zone to combat oil and shine, and under my eyes so the concealer is less likely to move and crease.
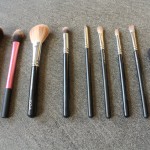
As for tools, I took with me the Real Techniques Buffing Brush and the Real Techniques Miracle Complexion Sponge which I’ve been loving a lot lately as it’s great at hiding any tale tale signs of streakiness which can be left behind when using brushes to apply your base. I also took along the Real Techniques Setting Brush for precision powdering, and the Zoeva 142 Concealer Buffer Brush for blending out concealer but more often than not I like to use my fingers as I find the heat from your fingers a great way for blending in concealer seamlessly.
Brows
I had packed with me the Hourglass Arch Brow Sculpting Pencil in Dark Brunette along with Collection Colour Lash Mascara in Clear. In hindsight I should have brought an angled brush so that I could have used a powder through my brows instead as I found that the Arch Brow Sculpting Pencil a little smeary in the heat. Noted for next time.
Eyes
I bought my customised Mac pro (quad) palette with four eyeshadows: Mulch, Woodwinked, All That Glitters and Mystery. Woodwinked and All That Glitters work great as a solo shade on the eyes as a day option, and Mulch on the outer corner paired with Mystery in the outer V and along the lash lines (top & bottom) work a treat in the evenings. I love these palettes as you can chop and change the shades by swapping out the refill pans to suit your mood/occasion. The brushes I brought with me were the Mac 239 Eye Shader Brush for packing on colour, Mac 217 Blending Brush for blending out harsh edges, Mac 219 Pencil Brush for smudging along the lash line and the Zoeva 231 Petite Crease Brush for precision application. If I was being very strict with myself, I can just narrow it down to just two of these brushes.
I also took with me two eye products (although one will do, two gives you more options) for days when I don’t want to faff around with eyeshadows; the Rimmel Scandal Eyes Eye Shadow Stick in 03 Bad Girl Bronze and the By Terry Ombre Blackstar in 13 Brown Perfection. Both waterproof formulas are fool proof; just scribble onto the lids and smudge the edges out with a fluffy blending brush or do as I do, with my fingers. These are great because they can be worn quite sheer and subtle for when you want something not so obvious in the daytime but just enough to add that bit of definition, or they can be built up by layering for more intensity when you go out in the evenings. If I’m totally honest, I reached for these on most days as I just couldn’t be asked.
To add definition along the lash line, I brought with me Charlotte Tilbury’s Rock ‘n’ Kohl Liquid Pencil in Verushka Mink and to line my top waterline to fake thicker lashes, I bought with me the Eye of Horus Goddess Smokey Eye Pencil. I bought this because Sharon Farell had raved that this waterproof formulation didn’t transfer when worn on the waterline. Now if I’m being totally honest, there is a little bit of transfer onto the bottom waterline when the product is worn on the top waterline. It’s better than a lot of the ones I have tried from the high-street, but still not 100% smudge/budge/transfer proof. If anyone has any recommendation, please let me know.
For my lashes, I packed my Shu Uemura Eyelash Curlers (of course) and the Maybelline The Falsies Volume Express Waterproof mascara. Both combined create long, thick, gravity defying lashes.
Cheeks
For cheeks, I just had to bring my Narsisst blush Palette. This was actually bought for the purpose of being able to carry around 3 products in one palette whilst on the go so it’s a holiday staple in my eyes. To be honest when I ordered the palette, I had expected it to be a tad bigger than what it is but hey ho, smaller packaging means more space for more makeup 😉 The pallette contains a highlighter (in Devotee), a blush (in the infamous Orgasm) and Bronzer (in Laguna). It also comes with a face brush but instead I packed my short-handled face brush which I got from a set in the sale from Space NK.
For that subtle sheen on the tops of your cheekbone and the area just under the brow when your face catches the light, my must have product is Benefit’s Watts Up highlighter (or I could just use the highlight in my Narsissist Cheek Palette but I prefer the Benefit cream option). I’ve raved enough about this product before so I’ll just leave it here.
I also took along two cheek products that were kindly sent to me from Deborah Milano; their Terra Lumi-nature Bronzing Powder in the shade 4 and their Hi-Tech Blush in Terracotta. The bronzer is quite warm so comes off much more orangey/red in tone compared to the likes of Nars Laguna but I’d say the colour is as dark as Benefit Hoola. When I’m tanned I struggle to get Nars Laguna to show up on my complexion so I always find myself reaching for Benefit Hoola but Deborah Milano is great for those who prefer a bronzer/contour with a lot more warmth. As for the blush, I’d definitely say that the shade Terracotta is best suited for those with medium to dark skin tones. It is a very warm peachy/orange shade and looks great with a tan and I found myself reaching for this on most days and evenings. It has great lasting power too.
To apply my bronzer, I took along with me the Zoeva 127 Luxe Sheer Cheek Brush which I find to be the perfect brush to get around the contours of my face and to carve out some cheekbones.
Lips
I bought 4 lip products with me (not including the MAC lipstick I bought at Duty Free). The first one goes with me whenever I’m going to a hot country/city especially when I expect to be doing a bit of sunbathing and thats the Elizabeth Arden Eight Hour Cream Lip Protectant Stick with SPF 15 (oops, I forgot to include this in the photo). I’ve learnt my lesson from previous years, back in the day, where you would find me sunbathing with Lancome Juicy Tubes on my lips. Let me tell you now, unless you want ten ulcers on your lips (yes, not in my mouth but on my actual lips), I suggest you DO NOT wear lip gloss without SPF on your lips whilst sunbathing. Trust me, I learnt the hard way. The next few products are different lip options; a bold, matte red lip in the form of Bourjois Rouge Edition Velvet in Hot Pepper, a bright, matte low maintenance lip crayon in the form of Revlon ColourBurst Matte Balm in 210 Unapologetic, and finally a peachy lipgloss in the form of Nyx Butter Gloss in Peach Cobbler. If you’re wondering what MAC lipstick I picked up in Duty Free, it was their lustre finish lipstick in the shade Plumful, a neutral pinky, plum shade.
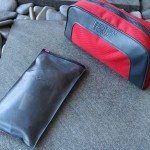
So thats it. I’ve tweaked my list to accomodate the things I wish I had brought with me i.e. an angled brush, so that the next time I go away, I should have everything I need. Everything bar the brushes, fitted nicely in my makeup bag (it’s actually a men’s washbag from Biotherm which was a gift with purchase- I got it from my friend who used to work on the counter). I packed the brushes into a zip-loc bag which I got from a Zoeva order (very handy).
What products are your holiday staples?